Quantcast
Channel: NerfHaven - Mods
Viewing all 627 articles
Browse latest View live

Nerf Mega CycloneShock cylinder drop mod

$
0
0

Hi all, 


   New to this forum.  Recently made a mod on Cycloneshock.  I initially wanted it to shoot stefans, so I re-barrelled it. Then I realised I need rear loading, so I cut open a rear-loading slot. Eventually I decided a single rear-loading slot is just too inconvenient, so I cut away the front half supporting structure, re-fitted with a hinge, so the whole cylinder frame can flip downward for fast loading.


   Anyway, the result are just ok.  Since I never did any spring replacement, the blaster now performs at a consistent range of 75 feet, shooting stefans (flat shots, not angled).  I guess some air-seal was lost due to the flipping structure, so still looking for ways to improve it.


IMG_20170919_194347.jpg

IMG_20170919_194419.jpg

IMG_20170919_194518.jpg

IMG_20170919_194540.jpg

IMG_20170919_194613.jpg

IMG_20170919_194635.jpg

IMG_20170919_194708.jpg


Pump Action Buzzbee Champion

$
0
0

So I was looking at a pump action reaper guide and realized there wasn't any one that was exact for the champion!

Here's the pic of my finished one. Spray paint job is crappy because me and my dad didn't have the stuff to take it apart. Sorry.

https://cdn.discordapp.com/attachments/352852966945849355/363811710718443520/0930171713a.jpg

As you can probably see. All I did was add a pipe barrel. You'll want about a 7 inch or so barrel of 1 inch inner diameter PVC. At the end cut out a 1 inch wide and long channel so the dart tooth can go through. Slide that in the barrel, make sure it fires with it in, then screw it on in. next up is the pumpy grip. Take a 1 1/4th inch length of pvc 3 inches long and slide it over. Prime back your gun and get a small rectangular length of just about anything. The gun I made used aluminium strips. They're normally about 13-12 inches long but if it's too long you can always cut it down. Screw the strip into the priming handle on the top but not too far or it'll prevent it from priming. Now screw the other end into the 1 1/4th inch pvc so when you pull that pvc back it primes the gun. Repeat on the other end and congrats, you have a home made pump action nerf gun. It's fairly simple but I didn't see any posts of people doing it on here so far so I figured I'd make one here. Any other modifications to it you need to do beforehand.

EDIT: I forgot something! You need to cut off the tip of the barrel. the first little inch that's smaller then the rest. You also need to dremme/drill out a bit of that orange front piece that the pump slides into. It'll prevent it from going all the way back. You'll know what I mean once I make one. Just use a drill or something and you'll be fine

Rival series flywheels and Magnus Effect?

$
0
0
So to get started, the Magnus effect in short: when a cylinder or ball moves forward and spins in a 'reverse roll' style, it produces lift.

In more detail: https://en.m.wikipedia.org/wiki/Magnus_effect

In action:


So the question is, could we tune the motors of Rival flywheels to spin with a speed just different enough to give backspin, thus lift, thus range? And is it worth it?

Red vs Gold

$
0
0
I am currently working on a stryfe build that I plan to use fang motors and maybe hoonigan flywheels. So I started looking at the artifact FWC and was wondering if the gold one (canted) would help make the blaster even more precise since I alr3ady use waffle tips, or should I just stick with the red (straight).
-Thanks

Worker "130d" motors?

$
0
0
Hey guys I bought the Worker non-canted flywheel cage "kit" (cage, wheels, "130d motors", barrel, switch, wiring) for my stryfe. I really like the "kit" other than the metal wheels (using Worker plastic wheels instead) and not knowing anything about the motors (using stock stryfe motors for now)

Any of you know anything about these "Worker 130d motors"? Are they meant to be a slight upgrade while still using stock AA batteries? Are they meant to be used with Imr batteries, or 2s/3s lipo?

I have no clue how to read Chinese or even begin to research it which is why I'm hoping someone here happens to know.

Please let me know if you have ANY info on these "Worker 130d motors".
Thank you!

Titan-Turian Sleeper

$
0
0

Cap'n Whitebeard, the E&C nerfer back again, showing off the project I have been working on since I traded for a Centurion at APOC... 16? Anyway, here goes. For those of you that were there, the monster we discussed has been born.

I am not going to make this a tutorial Ok that was the plan but it's almost there now. BUT STILL- the total cost of parts is some where around $200, and I don't expect anyone else to make one-it requires a 3D printer and a lathe. It's also not really war legal for several reasons. If you are feeling lucky (punk), then message me and I can help out with the 3D printed files. There are 6, and they took me around 25 or 30 hours total to draw up.
The goal of this project was to create a sleeper of sorts- as stock looking as possible with ridiculous amounts of power under the hood. So forget war-legal, that always means singled titan. Which I have plenty of parts for. Don't judge, it was a phase. I bought every titan I could get my hands on.
So, listed in no particular order, with pics at the end:


BATTERIES

The batteries are in a 3D printed box (the black one in front of the trigger), installed in a battery tray I bought online. It has a clip that keeps the tray in, but bends for tray removal. There is enough wire at the top to pull it out a couple inches. The batteries are 26650's, so... 7.2v @3500 mAh? Something like that. The install of the box required a lot of cutting, and then rebuilding the interior of the shell to a shelf that i could glue the box to. Enter epoxy putty and 2 part epoxy.

In the picture below, ignore the hose, gauge, and ducttape. That all got changed in a redesign. The ducttape was wrapped around a hose clamp because it kept trying to cut me.

1477204194303.jpg

PUMP

This was bought at the Mart of Walls for around $15. Cheapest one on the shelf. Pulled apart, fits almost perfectly in the stock, minimal shell cutting. Made me very happy.

20160908_152950.jpg


PRESSURE STUFF

The NC pressure switch and the new gauge were purchased from McMaster. Switch is adjustable, with lowest setting around 35 psi, which is plenty of power for drywall not expecting a shot (more on that later). Max is beyond what I would ever set it at. Most of the tubing is repurposed from the pump. The hose to the gauge is different for more flexibility. The barbed T fittings are also from McMaster, and were trimmed to the first barb because space and then hose clamped because safety and leaks.


BUSINESS MIDDLE

The connection and slide from the tank forward is 1 inch schd 40 pvc. I know this ends up killing some power, but come on, its a singled titan. The only way around this is to have the tank slide back and forth and be directly connected to the dart chamber. Too much work.

The dart chamber and sled are 3D printed, then welded together. I will probably put a pin in it at some point for piece of mind on the connection. The two parts took most of the CAD time listed above.

The new trigger pull attaches to the original trigger in the same way, then goes up to hook on the firing pin of the tank. It uses the original slide pins to operate, though the shell around them was reinforced due to twisting from forces.


BUSINESS END

The original barrel is way too big, so I simply put some 3/4 pvc down it. It has some wrapped ducttape spacers to keep it centered and is glued in place. It actually extends all the way into the blaster to sit right up against the short section that houses the dart tooth. Final length to be determined, it was just something I had laying around and I didn't feel like cutting it down at the time. I will probably cut it to match the length of the stock blaster to hide it.


SO... SPECS?

Yeah I have no idea. I don't have a chrony, but from 15 or so feet at 35psi the trigger gets pulled and there is a flash of red and then there is a dent in the drywall. It was pretty much instant. I'm betting on 250 plus/minus 10 because of my paintball experience. I have not pumped the gun any higher than the 35ish psi, I only got it done last night. I will be testing it more thoroughly at some point soon (like probably tomorrow). I expect decent ranges. AKA I'll wreck North Korea's shit from my back porch.

OTHER STUFF (and answering questions before they come up)
The stock ammo is modified so I can reuse it.

No, it's not weighted, just filled.

Yes, I will bring it to wars. Probably won't be allowed to use it.
No, I don't plan on posting the 3D printed files. I don't trust the Great American Public.

Yes, I plan on shooting more drywall and other shit laying around to measure destructive capability.

Yes, I plan on privately testing more dangerous ammo.

No, you may not come watch or take part. I mean, alright yeah. Message me if you live nearby. Don't tell anyone.

No, it's not for sale.

No, I wont make you one. See point 4.


Thanks for reading, and I'll see you all at the next E or C event I get to.

Attached Thumbnails

  • 20160908_152942.jpg
  • 1477204212786.jpg
  • 20160924_024708.jpg

Zuru Turbo Advance - Internals & Spring Swap

$
0
0

So! I've been excitedly waiting for the Zuru X-Shot Turbo Advance to arrive somewhere I could actually buy it. Currently, it's available in the US at Sam's Club and Bass Pro. Neither of those are great places to have to go for NERF-related stuff (One being a membership club store, the other having few locations), and living in the Pacific Northwest, neither readily accessible (We have loads of Costco's, Sam's hasn't gotten a foothold). Fortunately, I live in the one part of the PNW where Bass Pro is convenient so I went there and picked one up.


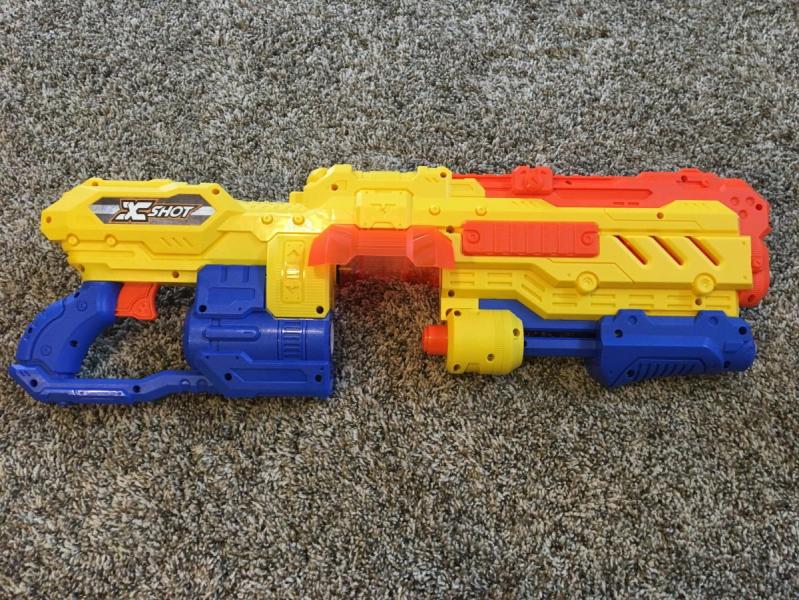
Here it is (minus included 40-dart turret/cassette):


image_6483441.JPG


For those not following blaster news like I've been, it's a 40-round pump-action cassette/turret fed blaster. The turret is more compact than in it's contemporary, the Dart Zone Magnum Superdrum (slide action, 40 round turret), because the darts are in two rings of 20 around the turret and there is a switch on the side to rotate the AR around to feed one ring or the other. There are no locks on the action, so once primed you can rack it back to advance the cassette/turret. It is also "easy" to swap the turret (hence, cassette) by pulling the cassette lock forward and poping it out.


I say "easy" because in reality, it is not something I'd want to do on the fly. The blaster needs some kind of guide to dropping the cassette in, and the rotation mech should be spring loaded to pop around the cassette index once it's in to really enable quick-reloading. But it can be swapped stock without modification (e.g.: early Magnum Superdrums), and so if Zuru releases cassettes or someone makes a 3d printed or CNC'd one someday, having a few cassettes on hand to swap during downtime or between rounds would be appropriate.


Another note: I'm not sure I dig the wings. They look fine, but block the cassette if they aren't in just right. I'm also not sure they don't impair function - it's hard to tell where the cassette is in the rotation and to reload the last few slots with them in place without racking the blaster a few times. I may pull the left-side one off and leave the right, as the left one is the side the cassette rotates towards and I'm right handed so I'd hold the blaster and reload from that side.
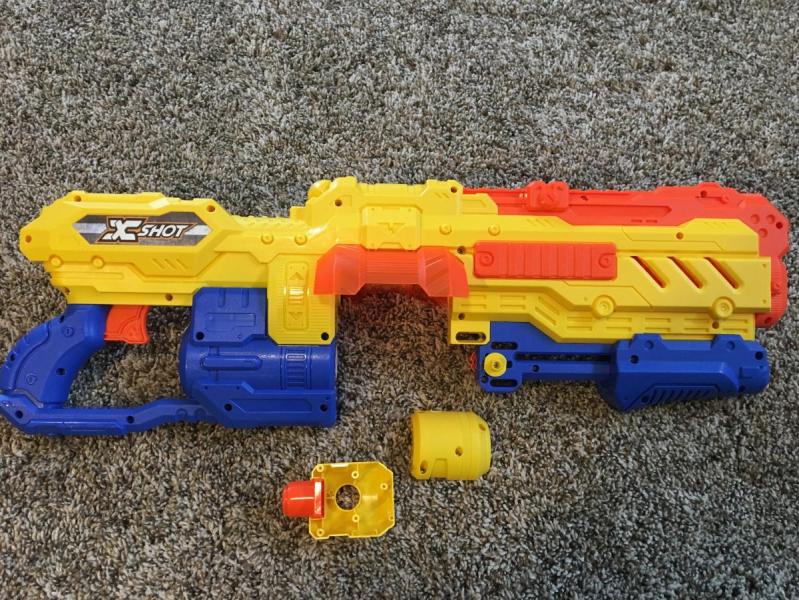
 

On to opening:


open0.JPG


First pull off aforementioned cassette lock. Note lock button is a separate piece, pay close attention to how it goes back in then remove it.


maglock.JPG


See this? This is the tricky part. It's not as symmetrical as it looks. Make sure the dots on the screw side of the cassette lock go into the depressions on the blaster, and the button nests cleanly in the lock housing.


open1.JPG


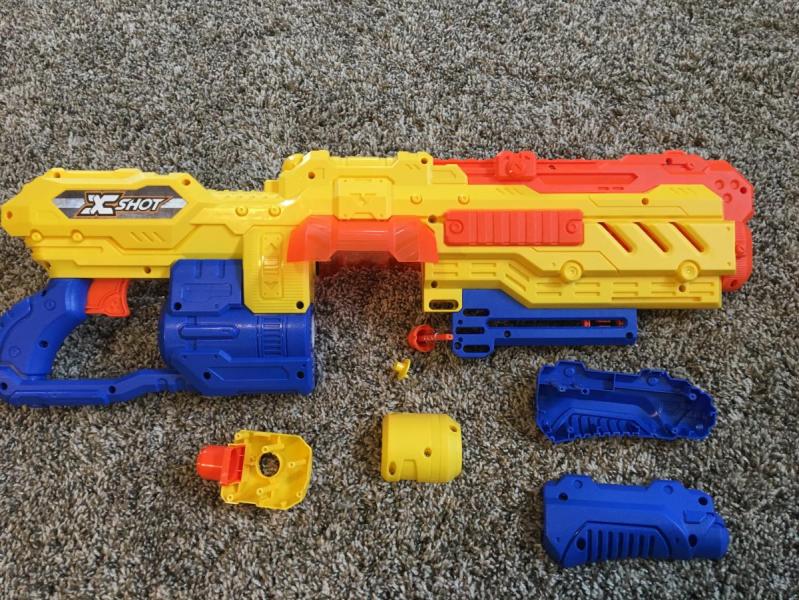
Also remove the pump grip. No issues here.


open.JPG


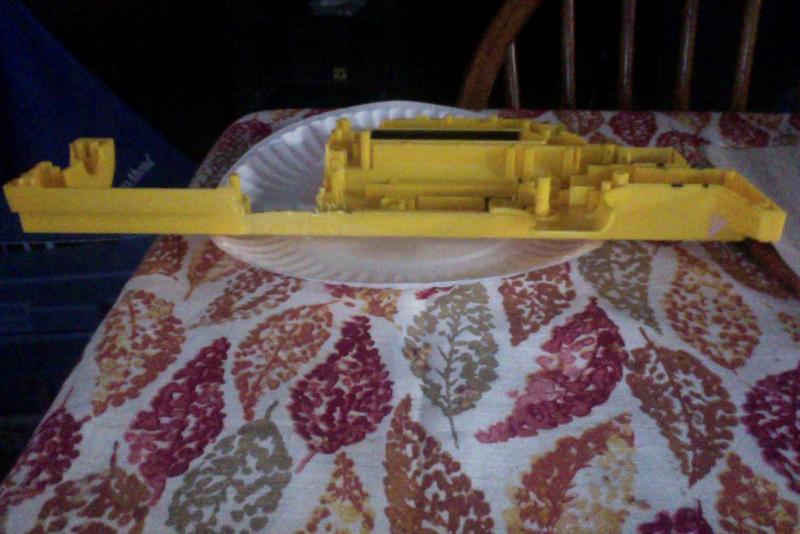
Remove the shell half. I leave the screws in place as much as possible when disassembling blasters, for cases like this: I count 27 screws in just the shell in that picture. It'll make reassembly later slightly trickier than if the screws were out, but it's so much easier to keep the screws where they belong this way.


spinners.JPG


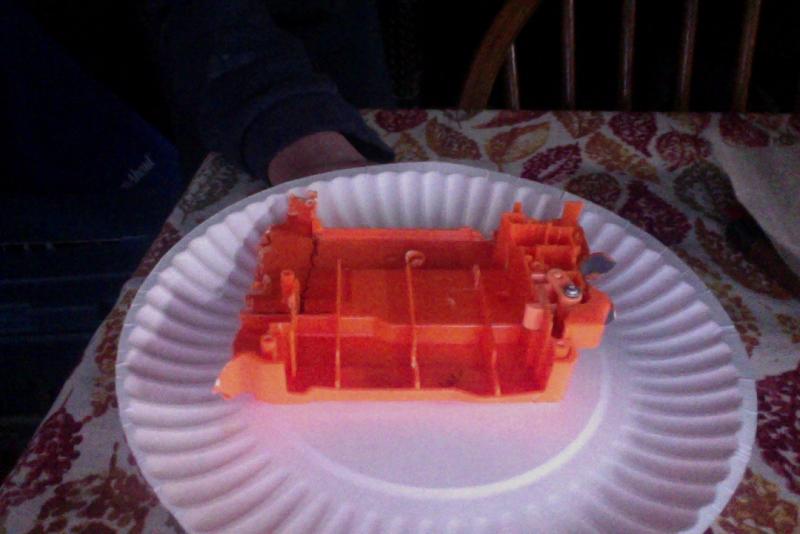
Pay close attention to the position of your cassette-ring selector switch and the location of the AR. You'll need to put the AR back in and it needs to go the same way as the switch. If you don't remember or it got moved, put the switch in one location and the AR facing the same way. You should be able to test the switch with the blaster open like this.
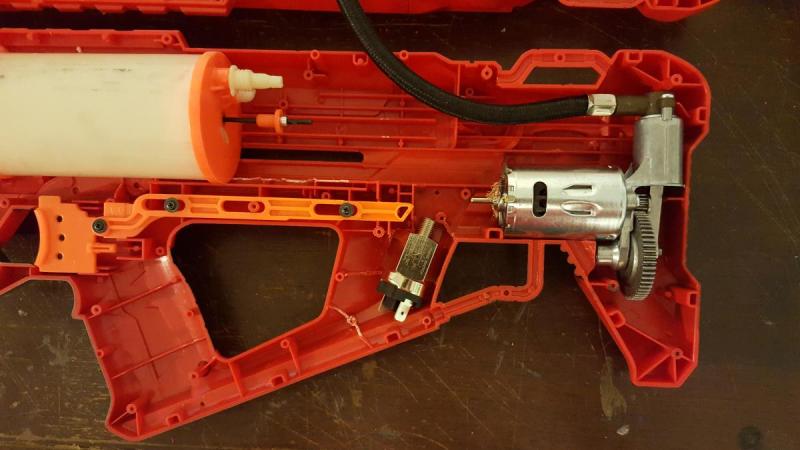
 

internals.JPG


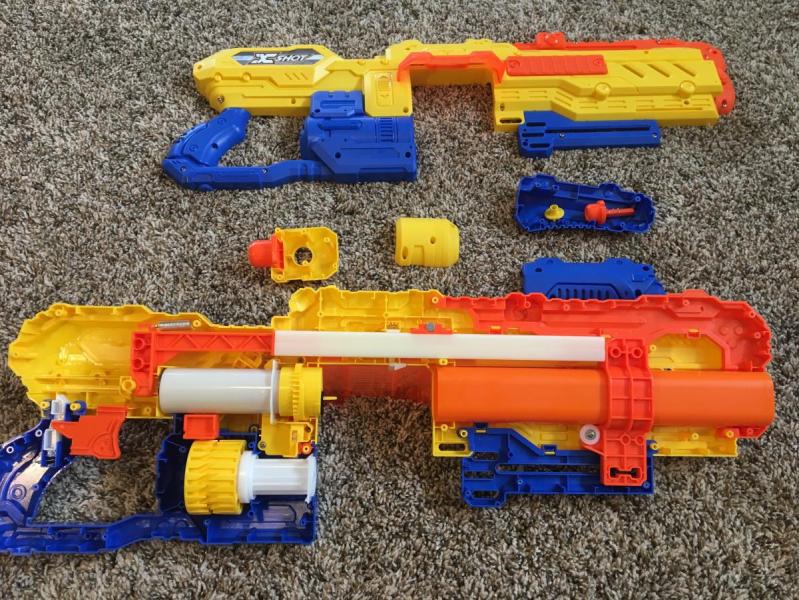
The actual guts of the blaster are mostly in one-piece and pull right out. Note also that the trigger isn't attached to anything. It'll give you some grief during assembly when it falls out on its own, but it shouldn't be too hard to set it back in place. For this guide, I'm leaving the turret parts in place. The orange turret advance piece fell out on me once, but it just drops in as shown.
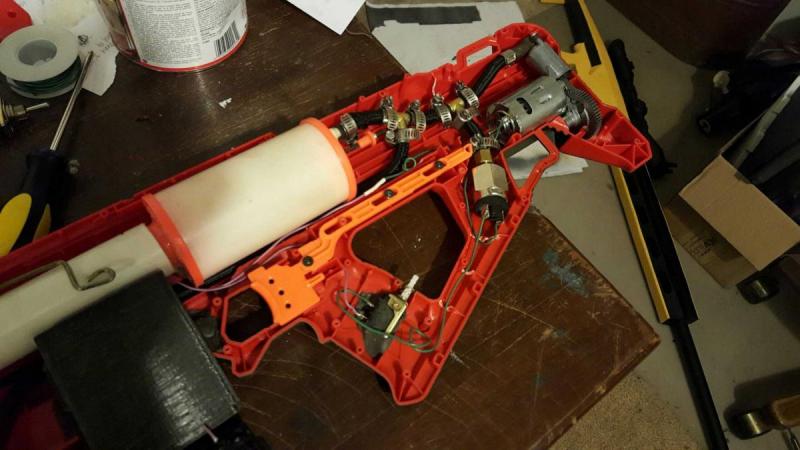
 

springs.JPG


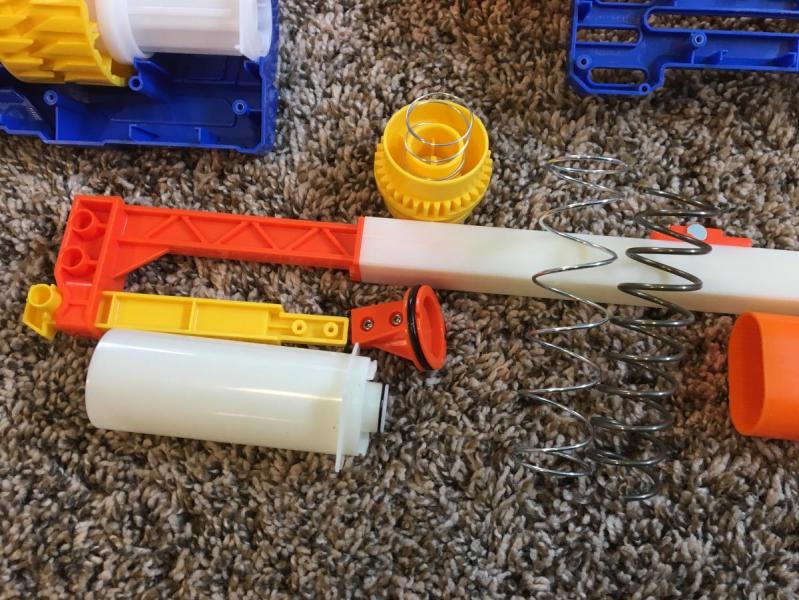
Here is the PT assembly disassembled. PT slides off the plunger no problem once it's out of the blaster and the AR is set aside. PH is attached to the PR in a nice mechanical plastic-part to plastic-part way, with screws to keep the two from separating. I'm sure the PT slides backwards through the pump assembly with the PH removed, though I did not test it for this guide.


The spring that comes stock (left) is fairly weak, which prompted my disassembly of the blaster. I was getting 1/3rd to 1/2 the range of my Caliburn or M6 with the stock spring, which is unacceptable (I believe my Retaliator and TTG's are more like 1/2-3/4 the range). Yes yes, range tests are lame, but I don't have a chrono and using the same dart for the test tells me about how much energy each blaster is putting out. It was significantly less in this case.


So the [[k25]] (right) cut down to 8 loops (start at the cut end, draw a straight line that intersects the wire 8 times, cut the last wire that intersects; alternatively, it should be slightly shorter than the stock spring) got dropped in. I reassembled the blaster (reverse order of the picts) and then attempted to fire. Unfortunately for me, the catch isn't catching consistently, so I'll need to find a better catch spring and try again. At first, I thought the problem was spring length, which it probably was, but now that I've shortened the [[k25]] to 8 loops instead of 9, it's still not catching. When I get another chance I'll pop the blaster back open and drop a better/second catch spring in there and try again.


With the [[k25]], the blaster feels more powerful, but I can't test due to weather. I hope to update this soontm  with more information and results as I have them.


Edit: Clarity

Simple mods for people without screwdrivers

$
0
0
So I have the problem of not having the proper screwdrivers for modding, which is holding me back from really modding my guns. Luckily I have found an alternative that won't get me in trouble, because my little brother is a snitch, tape. It sounds ridiculous but believe it or not if you put it over the external air release holes or vents it adds at least 1 or 5 feet longer range. That is how I made the raider cs 35 better. I was having problems with the range of it so I had an idea, since I can't access the air restrictors why not tape the opening to unclog clogs. It had holes on it I used scotch tape and voila, it added a yard or a yard and a half to the range. It experimented with other guns and the same principle applied. Anyone have a suggestion for screwdrivers, I hate my noob mods. Also when I get the screw drivers I need a suggestion for the doominator or springs. On more think which gun is best without modding? I promise I'll reply as quick as possible.

deploy with demolisher integration any ideas how to do it?

$
0
0

i have a deploy that i wanted to mod and make a #flywheelmasterrace weapon i have done the electronics and made it run on a drone lipo battery and i have an idea of where to make the integrations but i have no idea if they would work i'll try to add pictures so you guys can see where I'm stuck at and put your own input into


Photo on 10-23-17 at 17.43.jpg


Photo on 10-23-17 at 17.44.jpg

Worst Mods/Paint Jobs You've Ever Done?

$
0
0

We've all had our fair share of janky mods and bad paint jobs. What's the worst mod or paint job you've ever done?


1. Here's my old Stampede. 116152.jpg

Yes, I was a total noob at painting back then and had a budget of maybe $40 a month tops. I obviously tried to go for a more wooden-furniture look and some blood splatters that didn't work out.

#2, the Magnus Rifle. A product of function over form and outdoing the Centurion, this was done with a bread knife and a hot glue gun, just like the old days of Nerf.


Of course the hot glue would never last. Why should it?


And #3, my Rapidpistol "This Machine", what happens when you take a JLCustomsCreations Rapidstrike mod and use a bunch of hand tools and make a bunch of mistakes that prevent you from properly fitting a Rapidpistol kit from Blastersmiths UK on it.

120062.jpg
 

Now to be fair, it's functionally just fine (getting ~110FPS and 75-foot flat ranges with a high ROF), it works on 3 trustfires and a dummy battery (I know, everyone hates them but they work just fine for me and I don't see why everyone bitches about them). The Rapidstrike didn't come with an N-Strike muzzle piece, so the front end is just a big orange block and the stock mount wouldn't sit properly so it's held in by a shitload of 2-part epoxy. And the rough detailing is all done with a silver marker to emulate battle damage. 

Eclipse: 200+ FPS flywheeler

$
0
0


Review by Dennis Vilensky.

Hey guys, this is something I've been working towards for a while. It's a full envelopement flywheel system that runs on 180 brushed motors and fits in a stryfe without issue.

High FPS with buzz bee elites clones is 215.

Average with accufakes is 175, and with the RoF advantages of wheels, I'm expecting to be able to put up a fight in NIC games.

Wheels and printed cages should run about $30. Machined cages with wheels should go for around $70.

I'm hoping this can encourage the use of a more diverse range of blasters in NIC.

My version of the Gunputer

$
0
0

So, I met a friend who is a wizard with electronics and I brought him to a war. Long story short he fell in love with the rayven and because I pretty much gave him a laptop he offered to provide materials for my blaster and assist with modding it. So far we have the Picaxe In the stock controlling the display and we will soon have it controlling brushless motors reading motor rpm, fps (using ir beams in the barrel), battery life, ammo counter( haven't decided to use reed switches, physical switches or a color system using lights and darks to tell magazine size), and really anything else I can think off because we have a massive amount of headroom with the electronics but not too much in the physical sense. we might remedy that by buying a 3d printer and extending the stock (if we do that then well make it full auto too with fire mode selector) were gonna need a 3d printer regardless to print the cage for the brushless outrunners (probably going to be turnigy 2627 3800kv motors) Were gonna use these motors because there is already an open source rapid strike cage that we should be able to modify to the rayven. If you have any suggestions or questions please comment or inquire. (sorry mods if you see this as a thread that needed to be put in modification and paintjob pictures) and needs to be put in the sharing thread I see it as more of a request for experience and to help others trying to do something similar)

now for the pictures  :P


IMG_20171018_222244184.jpg?width=226&hei


JPEG_20171026_172703.jpg?width=226&heigh

Can anyone recommend a good glow in the dark base coat for hydro dippi

$
0
0

I've done some hydro dipping already, (pictures coming soon) and for one of my next projects I'd like to have a glow in the dark base coat under my pattern. I've seen a few different paints, read a few reviews, and seen some powders that you mix with an acrylic paint to get the glow effect, but I'd rather ask the community, and see if anyone has had success with anything similar in the past. Any help would be appreciated!

Gun show case

$
0
0

Rechargeable Batteries in Nemesis

$
0
0

Has anyone done testing with rechargeable D NiMh batteries in a nemesis?  I ask b/c I have some lying around and if they would give me similar performance to the nerf battery pack I'd just as soon use them and not have to spend the extra $30 dollars.


First Stryfe Mod (need help)

$
0
0

I am working on upgrading a Stryfe to a 3S Lipo battery. I have 16 guage wire (red/black), 2 Titan Chronus-X motors, and an extended battery door. I'm getting ready to order 1 Artifact Canted Metal Flywheel Cage along with Artifact Canted Metal Flywheels to go with them. This is my first electric blaster upgrade and I am wondering what parts from the original wiring I could use for the rev trigger and circuit? 

Motors for IMRs?

$
0
0

hello, i recently bought a stryfe and 3 efest IMRs with a dummy battery. i removed the thermistor and locks, and i was wondering which motors i should get? i know i should go lipo, but it's too much for me to handle right now so i'm sticking to IMRs. thanks for the help!

Questions about improving my Rayven

$
0
0
I love my Rayven, but I hate to admit it isn't doing as well as it should. Its range could be better, and an underbarrel add-on would help keep me safe during reloads. But last I checked, the blaster's been discontinued, so I thought I'd ask before doing something drastic and/or irreversible.
 
1) I understand that a voltage increase is a quick and easy way to get more range and speed. From what I understand, the most common solutions are higher voltage AAs (i.e. TrustFire 3.7v with dummy cells), or a dedicated 12v battery pack. Are there any alternatives I'm missing?
1a) I wonder if there's a way to use more conventional 1.5v batteries to reach 12 volts, like adding a second pack on the side somewhere. I'm just a little reluctant to buy a whole new charger just for a Nerf gun.
 
2) As far as underbarrel blasters go, there's almost too many to choose from. I'm leaning towards one of those Barrel Strikes but I have no idea if it'd fit onto the Rayven's mounting lug. Has anyone put those two together? If that won't work, I'll probably go with a Recon Barrel with something attached with 3D-printed rail-to-rail adapters; it'd give me an excuse to get a Rough Cut, at least.

What UV LED should I use to charge EKIND glow darts?

$
0
0

i didn't know if this should go here or in "darts & barrels", so sorry if this is in the wrong thread. just tell me if it is. so i tried making a PVC barrel with a UV LED in it, and the darts wouldn't glow. was it not bright enough? can someone tell me how bright the LED needs to be to charge them very quickly? the barrel was just for testing, i plan to put it under the jam door of the blasters i want to use.

Dual strike rumors

$
0
0
A couple of days ago at a nerf war, one of my freinds told me that the smart ar in the dual strike was extremley similar to the ones in the sweet revenge in the matter that you can take off the barrels to access the smart ar and in theory brass the barrel and still have a smart ar. And today I got to testing this and I can confirm these rumors are indead true.
Smart ar 2 https://imgur.com/gallery/Mi0zs
Smart ar 1 https://imgur.com/gallery/Ems82
Viewing all 627 articles
Browse latest View live