Hi, sorry - long time, no content. I've found a local, well established nerfing group so I've been able to pick up my favorite hobby again! And as such, I've decided to start chasing my unicorn - the project I've been trying to make for years. A reasonably simple and efficient pneumatic clip fed semi auto blaster. Some of you might remember my previous attempt involving a salvo tank plumbed in line to a secret shot pump that had been re-purposed into a piston. The theory was that when the salvo tank filled the pump would also fill - pushing the pump handle out like a piston and closing the breech. The problem, is that as soon as the salvo fired the piston retracted prematurely and half the air was blasted back out of the breech. I realized I would need a separate delayed valve to open the breech shortly after the dart had left the barrel on a delay. I looked briefly at the big salvo valve assembly. As the o-ring on the salvo trigger passed the buttons it bumped them open - venting and firing the tanks. To date I'd only looked at that valve group using the traditional pump input in the back to fill from so any space between the trigger o-ring and fill line would remain pressurized. Experimentation with this failed though. As the trigger o-ring passed a button valve it would leak air from the reserve.
My revisit - and the progress to date is again based on a big salvo valve assembly. My "erueka!" moment came when I realized that the big salvo trigger (something I had looked at before but had given up on) was comprised of 4 individual button valves/check valves - so why not fill from one of the back legs (instead of the normal always open fill line - since it operated as a check valve) and add a bumper to the salvo trigger stem to open the fill while the o-ring sealed in pressure!
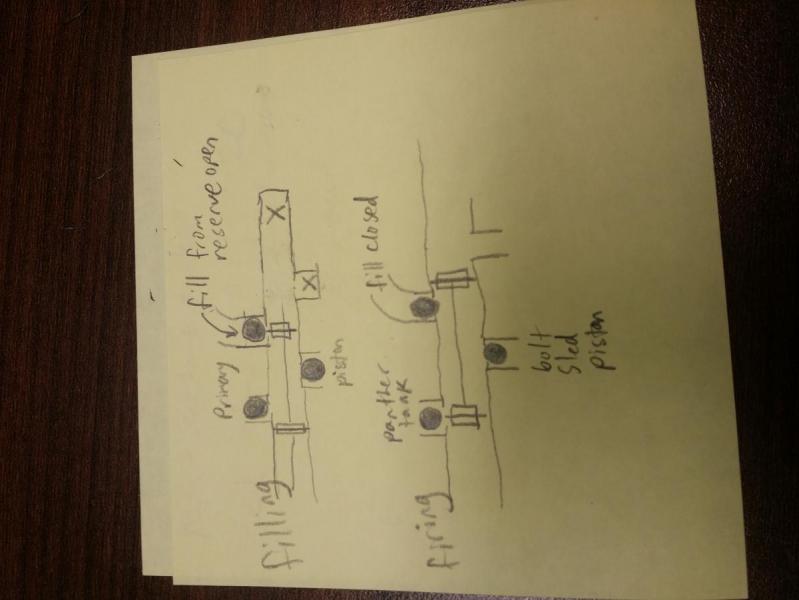
With the trigger fully retracted the valve group is sealed and the bumper opens the 3rd leg - filling the panther tank and retracting a piston - closing the breech and loading a dart. As the trigger piston begins to move backwards, the bumper slides off of the 3rd leg, (closing off the air reserve) and then the o-ring on the trigger piston bumps the first leg (firing the panther) and a fraction of a second later (hopefully long enough for the dart to leave the barrel) it bumps the second leg venting the piston and allowing the breech to be pulled open by a spring - chambering the next dart. When the trigger retracts the o-ring reseals the valve assembly and the third leg is bumped open again - priming the tank and closing the breech. The fourth leg won't be used.
I modeled up a longstrike trigger, added a riser with a big salvo trigger stem and then added the extension bumper on the end of it and sent it through my printer.

The white piece is my final 3d printed piece. It was a drop in perfect fit. Not bad for my first ever time modeling with anything, huh? (I used autodesk fusion 360 and printed in PLA)
So far, proof of concept has only happened as far as blowing into the third leg while sliding the trigger rod around inside. The 3rd leg air inlet shuts off at the appropriate time so I really, really think it'll work!
I bought a small piston on amazon and will be leveraging it's travel long enough to open and close the breech. I'll be picking up the fittings for the piston on my way home from work today. For my air reserve I'm using a banded rf20 bladder. I've still got some bridges to cross but for the first time in years, there is a light at the end of the tunnel!